LWC Create Record

Requirement :


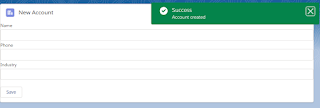
Create a LWC which will take information like Name, Phone and Industry and on click of Save button , record should be saved to the org as Account.

or in other words

Create account record LWC.

cmpAccountRecord.html

<template>
    <lightning-card title="New Account" icon-name="standard:account">
        <lightning-input 
            label"Name" 
            value={objAccount.Name} 
            onchange={handleNameChange}>           
        </lightning-input>
        <lightning-input         
            label="Phone" 
            value={objAccount.Phone} 
            onchange={handlePhoneChange}>
        </lightning-input>
        <lightning-input 
            label="Industry" 
            value={objAccount.Industry} 
            onchange={handleIndustryChange}>
        </lightning-input>
        <br>
<lightning-button label="Save" onclick={handleSaveRecord}></lightning-button>
    </lightning-card>
</template>


cmpAccountRecord.js

import createAccount from '@salesforce/apex/cmpAccountRecordCls.createAccount';
import { ShowToastEvent } from 'lightning/platformShowToastEvent';
import { LightningElement,track } from 'lwc';
export default class DevCmpCreateRecord extends LightningElement {
    @track objAccount = {
        Name : '',
        Industry : '',
        Phone : ''
    }
    handleNameChange(event){
        this.objAccount.Name = event.target.value;
    }
    handleIndustryChange(event){
        this.objAccount.Industry = event.target.value;
    }
    handlePhoneChange(event){
        this.objAccount.Phone = event.target.value;
    }
    handleSaveRecord(){
        createAccount({objAccount : this.objAccount})
            .then(result => {
                this.message = result;
                this.objAccount = {};
                this.error = undefined;
                if(this.message !== undefined){
                    this.objAccount.Name = '';
                    this.objAccount.Industry = '';
                    this.objAccount.Phone = '';
                    this.dispatchEvent(
                        new ShowToastEvent({
                            title: 'Success',
                            message: 'Account created',
                            variant: 'success',
                        }),                        
                    );
                }
                console.log(JSON.stringify(result));
                console.log("result"this.message);
            })
            .catch(error => {
                this.message = undefined;
                this.error = error;
                this.dispatchEvent(
                    new ShowToastEvent({
                        title: 'Error creating record',
                        message: error.body.message,
                        variant: 'error',
                    }),
                );
                console.log("error"JSON.stringify(this.error));
            });
    }
}

cmpAccountRecord.js-meta.xml

<?xml version="1.0" encoding="UTF-8"?>
<LightningComponentBundle xmlns="http://soap.sforce.com/2006/04/metadata">
    <apiVersion>48.0</apiVersion>
    <isExposed>true</isExposed>
    <targets>
        <target>lightning__AppPage</target>
        <target>lightning__RecordPage</target>
        <target>lightning__HomePage</target>
        <target>lightning__Tab</target>
      </targets>
</LightningComponentBundle>

cmpAccountRecordCls.cls

public with sharing class cmpAccountRecordCls {    
    @AuraEnabled
    public static Account createAccount(Account objAccount){
        insert objAccount;    
        return objAccount;
    }
}

Output:


Other Useful Blog

Lightning Component

Happy Learning !!

Comments

  1. Very nice knowledgefull post... you have explained in very detail..

    ReplyDelete

Post a Comment

Popular posts from this blog

LWC Show Records In Table

Requirement : ‹ › Create a LWC component which will show the most recently created 10 Opportunity from the org and show them in table having Name , Close Date , Stage Name , Type and Create . or in other words Show Opportunity data in table format. cmpOpportunityRecords.html < template >      < lightning-card   title = "Opportunity Records"   icon-name = "standard:opportunity" >                  < lightning-datatable                            data = {data}                columns = {columns}                key-field = "Id" >          </ lightning-...

LWC Development Environment

Requirement : ‹ › Setup LWC Development Environment  1. VS (Visual Stdio) Code 2. Salesforce CLI Download and install the latest version of  Visual Studio Code . Open the Visual Studio Code and add extensions by clicking on the extensions icon present on the left side of the VS code editor. Search for  Salesforce Extension Pack  and install the extension. After that install  Lightning Web Components extension. Once you done with installing the above two extensions Re-launch the VS code editor. Now it’s time to check that our environment is ready for creating Lightning Web Components by pressing  Command + Shift + P  on  macOS or Ctrl + Shift + P  on Windows and type  sfdx . Hola..!! you are now ready to create your Lightning Web Components. Creating SFDX Project First create a folder somewhere on your machine and name it  trailblazer  or anything of your choice. Navigate to that folder from VS code ...

LWC Component Only

Requirement : ‹ › Create a LWC having two input fields which will take two number as input and show result, addition happen on button click. cmpAddition.html < template >      < lightning-card   title = "Addition"   icon-name = "custom:custom62" >                   < p   class = "slds-p-horizontal_small" >              < lightning-input                    value = {firstNumber}                    name = "fnumber"                    label = "First Number"             ...